Wednesday, March 18, 2015

My Thoughts on Shooting Off Camera Flash in Micro Four Thirds Environment

Hello everyone, today I want to talk about my experience of Off-Camera-Flash in the Micro Four Thirds system. I am recently trying to improve the quality of my pictures significantly by learning how to light properly. Naturally, I learned about all the options: natural light, available light, artificial light. While I have been natural light shooter for a long time, there are times when natural light won't let you grab that picture that you want simply because you will have to crank your ISO to get the exposure from very dim natural light and the picture looks soft due to high ISO noise. That's when I decided to learn about using speedlight.

David Hobby Inspired

I am now a regular visitor of David Hobby's blog strobist.blogspot.com which held tons of high quality information about how to "light", mainly using off camera flash. Automatically, I then started to explore off camera flash and bought the right stuff to help getting better result using off camera flash and start to use that technique more and more to produce my shots. Now I flash almost everything when I bring my flash and I do it off camera handheld with no lightstand whatsoever. Doing it with Micro Four Thirds is really liberating because the camera is small and light enough that you can handle it with one hand easily while having your other hand holding the flash off camera, with or without modifier.

However, it was a bit difficult to me at first to get the right tools for doing off camera flash that are compatible with Micro Four Thirds since the information was scattered all around the internet and there was no proper single documentation of many different methods of doing off camera flash photography with Micro Four Thirds, especially the one that can cover newbies-level FAQs.

I spent at least three months to understand what will work and what will not work, and basically found interesting discoveries along the way that might be useful to know when you start shooting OCF using Micro Four Thirds. And now let me share some of my experience! Please be mindful that this is basically my personal experience and don't treat this blog post as some sort of an exact rule that you must follow; I could be wrong with some of the information especially about wireless triggers so please double check before you proceed with a wireless trigger.

Start basic off camera flash using integrated wireless flash system on newer Micro Four Thirds cameras and flash

Olympus FL-600R
When you purchased recent releases of Micro Four Thirds cameras(late 2013, 2014, early 2015), your camera will have the wireless flash capability using RC mode(remote control). The RC mode on your camera will work with flashes that support RC mode in Micro Four Thirds environment.

The way to do this is by using the built in pop up flash or the included mini hot shoe flash that comes with your camera, go into the menu and enable wireless flash or RC mode. Your built in flash now will act like a commander and it will send light signal to compatible flash that carries flash power information as well as the trigger, so that your external flash will fire with the desired flash output. If you want the flash to fire with automatic exposure, set the RC flash to TTL mode. If you want to set the flash power manually from your camera. set the RC flash to manual mode and set the desired power. Now align the external flash' optical sensor so that it can "see" the built in flash of your camera. You are now ready to fire your shot and get the flash to contribute to your exposure. You can put the flash down somewhere, handheld(as how I do it most of the time), or use a lightstand as long as the optical sensor can see the built in flash.

Flashes that are compatible with this RC mode is usually Panasonic or Olympus branded flash with "R" letter on the name. My preferred flash for this kind of setup is the Olympus FL-600R. To enable RC mode on the flash, simply change the mode to RC mode. Set the channel and the group on the flash to match those in the camera menu.

A quick information about the Olympus FL-600R; if you, like me, are doing full manual flash and need to change the power setting a lot, the FL-600R will provide the manual power setting with GN measurements by default which is hard to understand and not really intuitive for most shooting situation. You can change it to the regular flash power output unit by holding down the OK button for a few seconds, turn the dial until you see GN on, then change it to off using the dial.

If you don't want to spend money on Olympus or Panasonic branded full featured flash, you can go to third party brand that offers fully featured MFT compatible flash such as Nissin (i40, Di466). or Metz system; both feature TTL, high speed sync and many other standard features at slightly lower price.

On the budget: use third brand flash with optical slave capability
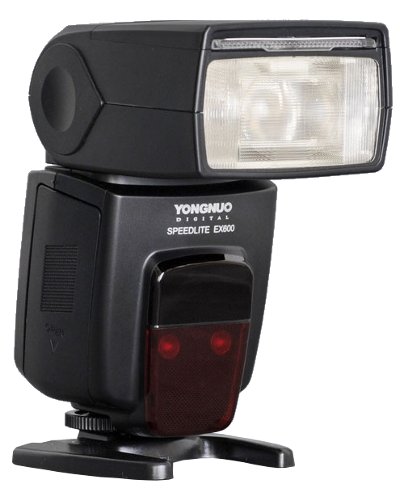
Yongnuo YN560EX, or also known as EX800
If you, however, can't afford such flash, you can go even lower with full manual flash that doesn't offer TTL. This way you can still use your flash off camera but lose the automatic TTL capability and the high speed sync capability. The general choice for such flash will be Yongnuo YN560 series, or other popular manual flash. My own personal choice is the Yongnuo YN560EX.

There are two ways you can do wireless off camera flash with these kinds of flash. The first way will always work and that is to just use the built in flash of your camera, set it to its lowest power(to minimize the effect of the exposure) and set your external flash to Slave mode(usually S1 or Sl Manual) and align the flash' sensor so that it can "see" the built in flash of your camera. When the pop up flash fires, the external flash will fire immediately and affect the picture. You will just have to set the power manually to get the desired exposure. Normally you will want the built in flash to contribute as little as possible to the exposure by compensating it as low as possible but you can also experiment by adding it to your picture as a fill flash.

The second way will work only with some flashes that have delayed Slave mode such as my Yongnuo YN560EX. The advantage of this way is that the pop up flash won't affect the exposure at all and will only act as a commander. To do this, go to the camera menu and turn on wireless flash or RC mode. Then go to your external flash and set its mode to Slave 2(S2 as in the case with my YN560EX). Set the power of the external flash manually, align the external flash sensor to the built in flash and fire away! Your pop up flash won't contribute to the exposure.

Use Off Camera Flash Cord, and use any flash!

Phottix Universal Duo TTL Flash Cord.
If you don't like the idea of aligning your external flash with the pop up flash of your camera, you will have two choice to avoid that and still be able to do off camera flash: 1) Wireless Remote Trigger or 2) Flash Cord. My choice for short range off camera flash photography is to use the Flash Cord.

My choice for flash cord is Phottix Universal Duo TTL Flash Cord, as pictured on the left. This cord features a pass through hotshoe connector that enables you to mount another hotshoe accessories on top of it, maybe your remote, or maybe another flash. As weird as it may sound, this pass through TTL cord isn't actually TTL at all, even though I bought the Canon version which is supposedly compatible with Olympus/Panasonic system. It turns anything to become manual; but I have no problem with it because I shoot my flash manually most of the time.

To use it, simply put your flash on the other end of the cable's hot shoe, and mount the foot of the cord that has pins on it to your camera's hotshoe. Set your flash to manual, adjust the power, and you are ready to take picture.

Some known information: you can have TTL capability using flash cord if you are buying Canon's version of off camera flash cord or a third party cord without pass through TTL that has the same hotshoe configuration with Canon's cord. Usually the name contains the word OC-E3. Use this cord together with your TTL capable flash, and you will have all the automatic features as well as the high speed sync capability maintained when using the cord. The only known issue is the reduced normal sync speed limit due to the construction of the cord.

The benefit of using this camera setup is that it is optimized for handheld external flash, which is very good for run and gun off camera flash photography such as in wedding or when you are documenting an event. If you need to put it on a lightstand, then you will need a long cord for that because most of the cords are only 1 meter long.

For far away off camera flash needs, go with a wireless remote flash trigger

Phottix Strato II transmitter and receiver.
Sometimes you just need to have your external flash very far away from you, the longest cord that you can buy is just too short for that, and your wireless RC mode alignment is blocked by an object. The only way to tackle this problem is to use wireless remote trigger.

This is where it gets tricky; not many people know which triggers work with Micro Four Thirds camera. The documentation gets scattered all around the internet and it will take you a long time to learn about them all.

I will tell you all that I know in this paragraph about remote flash trigger. Most of the triggers that will work will be manual only triggers. Some well known triggers for that includes PocketWizard manual trigger that isn't brand specific, Yongnuo manual triggers, Phottix manual triggers, and Cactus V series in manual mode. There is no TTL capable wireless flash triggers that is Micro Four Thirds compatible as of today that I know. Also high speed sync wireless flash triggers is not available yet for Micro Four Thirds, even for manual triggers.

For PocketWizard, that means Plus series, including II+ , Plus III and PlusX; as always with PocketWizard, your flash needs to have PC Sync cable jack, which isn't present in my Olympus FL600R. For Yongnuo, that means the RF series(RF603, RF605, etc). For Phottix, this means Phottix Atlas, Ares, and Strato series(make sure they are non TTL ones, buy the Canon version to match the hotshoe pins). For Cactus, the V series should work in manual mode but I have no experience.

My GX7 with Phottix Strato II attached.
My personal experience is with the Phottix Strato series. I bought a Phottix Strato TTL, and it DOESN'T WORK because of the TTL thing; it just won't fire at all, unless when I mount it to a Canon camera.

I then bought a Phottix Strato II Multi which works in a fantastic way and syncs down to 1/320ms on my GX7 and E-PL6 with no problem. Keep in mind that this trigger is full manual and doesn't do high speed sync. If you need high speed sync, you must use the wireless RC mode.

Or, like me, you can trick the camera to get the high shutter speed exposure down to sync speed range shutter speed by using a 4 stop ND filter. My preferred ND filter is Hoya but any brand shouldn't matter as long as you check for any color cast and sharpness issues before you buy it. Please note that by doing so, you will not only drop the exposure of the ambient, but also you are going to lower the flash power by 4 stop. To compensate for that, you have to increase the flash power by 4 stops(for example: 1/32 to 1/2).

On a more positive note, the transmitter has a pass-through TTL hotshoe that actually works to let-through the TTL information to whatever thing that's on top of it, so you can actually mount another flash on top of the transmitter and have all the TTL and high speed sync capabilites maintained...or mount another trigger....or mount your flash cord for a more complicated multi flash setup... or mount any other hotshoe accessory that requires all the pins!

What about my personal setup?


Crazy off camera multi flash setup with one trigger.
See this crazy picture on the right? I can trigger two flashes that are connected by the off camera flash cord using the Phottix Strato II. I can also put the cord on top of the transmitter on my camera and have two flashes there, one off camera on the cord handheld using my left hand as the main light, one on top of the transmitter as the fill or to bounce, and an extra flash on the receiver being triggered far away from the camera.

Modifiers?

As for modifiers, I do use Rogue Flashbender Large a lot for event photography and product photography with my off camera flashes. This modifier works best at close range and can almost act like a soft box when you put a white diffusing material in front of it.

I also sometimes use my home-made Lightsphere DIY made from plastic paper bowls with holes to mount the flash. Not the prettiest but it works and I can't justify spending US$80.00 for a modifier yet.

For outdoor, I do everything bare flash and try my best to control the harsh shadow to appear as minimal as I can.

In the future, I will probably get an umbrella for studio-like photo or for on location shooting. Or maybe a real soft box. But for now, I am happy with what I already have and they do their job very well, at least for the kind of photos that I need to make(product photography, event documentary, quick indoor portrait).

That's all for my off camera flash experience, I hope this post helps you and I will definitely update either here or on a new post if I learn something new. Cheers and God bless :)


Sunday, March 8, 2015

On Top of The World: Panasonic Lumix G X Vario 12-35mm f/2.8

Hello everyone, today I want to talk about the Panasonic 12-35mm f2.8 that I acquired few months ago that has been my main lens since December 2014 until today in my Panasonic GX7. To start, the 12-35mm f2.8 is what considered by many as the professional grade lens from Panasonic for the Micro Four Thirds cameras. This lens has the constant f2.8 aperture at all zoom settings, complete with weather sealing and a very effective Power O.I.S. Stabilization which is very useful for Panasonic shooter.

First of all, this lens covers full frame equivalent of 24-70mm which makes the zoom range of this lens really useful as a general purpose mid-zoom lens with moderate wide angle territory at its widest zoom up to normal portrait territory at its tightest zoom. This could be the perfect event photographer and wedding photographer lens for covering wider shots as well as a good solid walkaround lens for general travel and day to day use. 


Let's start, what do I like from this lens?


The size of this lens is very similar to my Panasonic 14-140mm f3.5-5.6 as well as my Olympus 75mm f1.8 which I admit is on the big side for the Micro Four Thirds world, but then again, this is only as big as your APS-C 18-55mm kit lens for Canon or Nikon DSLR which is actually a LOT smaller than the real 24-70mm f2.8 of the real full frame. The lens comes with lens hood and pouch. I recommend to use the hood all the time, not only to protect against flare, but also to protect the front element of this lens.
The sharpness of this lens is definitely very sharp as expected from a professional grade lens, and the f2.8 aperture really helps to gather a lot of light especially on low light situation. Combine that with a good optical stabilizer in the lens, this lens does very well in low light and can save you a few stops of light so that you don't have to go higher than ISO 1600 when shooting in dim light conditions.

I love the fact that this lens cover all the standard normal prime lens focal lengths such as 14mm, 17mm, 20mm, and 25mm. This makes me approach the lens as some sort of a collection of prime lenses in a single lens as opposed to a lens with zoom capability. I shoot very often deliberately at dedicated focal length and leave it there to simulate the field of view of the prime lens that I have in mind. This makes this lens the best lens for street photography. Again, coupled with the fast aperture of f2.8, this lens is very flexible when shooting streets.

Autofocus is as fast as the lens can be which is as fast as every other lens that I've reviewed in my blog. There was one or two instances in my personal experience where the focus was actually locking and armed but it actually mis-focused completely although it was on single small point autofocus and the light was good(mid-day sunny outdoor light). This happened at least once every 40 or 50 shots which isn't bad by any means and not worrying at all, but at least you should know. To compare, my 14-140mm f3.5-5.6 only misfocused once or twice during good light, it only misfocused when it was really dark and the camera metering can't get more than -3EV.

On a side note, people seemed to talk about the rendering, contrast, and color of this lens. I do kinda understand about the contrast, but I don't find anything special in particular of this lens when we talk about the rendering or color, it's all the same to me with any other good Micro Four Thirds lens. I can assure you, this lens is sharp, contrasty and worth the money!

Bonus point for this lens, it has a quite close minimum focusing distance at all focal length, making it useful to get an emergency macro shots if you need to. Also this lens handles flare like no others! Very little flare although not completely flare-less like the 75mm f1.8.

What are the things that I don't like from this lens?

As I mentioned before, there were a couple of instances where the autofocus missed the object completely. Also you should know that this lens is a bit soft at 35mm at f2.8 on the closest focusing distance although it is very sharp at longer distances.

I also need to mention that this lens is a tiny bit heavier than the 14-140mm f3.5-5.6 although not by much. You can feel it when you handle the lens for an extended period of time.

I do wish this lens max out at 40mm instead of 35mm but now Olympus has that 12-40mm f2.8 as an alternative to this lens. If you need longer distance, you can get that Olympus version which is as sharp as this lens but minus the stabilizer.

Other thing that I don't like from this lens is the fact that the lens hood is very easy to get knocked when shooting, resulting in a strong vignette in your photos when you don't realize it. 

Be mindful when shooting at 12mm, the perspective distortion starts to kick in at that focal length, better switch to 14mm if possible to avoid significant perspective distortion and keep your verticals as straight as you can.

Conclusion

After using this lens for a few months now, I can safely say that this lens is very good. The focal length range do makes me feel a bit limited sometimes, but that's how all the full frame 24-70mm lens are behaving anyway. I do love the sharpness of this lens, the fast aperture, the build quality, as well as the stabilizer and the weather sealing of this lens. The macro capability of this lens is also surprisingly helping me a lot of times.

I do, however, question about how much sharper this lens is when compared to Panasonic 14-140mm f3.5-5.6. It turns out that the 14-140mm f3.5-5.6 is also very sharp and the 12-35mm isn't that far from it. So I do have to say that if you don't need fast aperture and you need flexible focal length range, go get the 14-140mm f3.5-5.6 instead and save your money; you won't be able to tell if the 12-35mm is sharper anyway unless you pixel peep at 100% on your computer screen. If you, however, need the big aperture, the weather sealing, and the constant aperture, go get this lens and let me assure you it's worth the money. Or if you already have a dedicated lens to cover anything above 45mm focal length, then this lens will make sense to back it up.

Let me share some sample photos:


Landscape at 12mm? Check!

Street photography? Check!

Flare control when shooting at the sun?
Very good, but not totally perfect. See that purple spot?

More street photography.
Close up semi macro photo.

The big aperture makes it very flexible to shoot
in conjunction with off camera flash techniques.

More flower with off camera flash techniques
to reveal ultimate sharpness.

It is very punchy and contrasty!

More close up work.

More street photo stuff.

This lens is heavenly when used in street photography.

Again, street photography.


This is how wide the 12mm is. (24mm full frame)

This is as close as it can get.

See that detail in the wood pieces?


I hope this review helps, until next time and God bless you :)

Monday, March 2, 2015

Quickest Way to Start Shooting in Semi Auto or Full Manual part 1

Ever wondered why your friends who shoot full manual or semi auto modes on their cameras can make their pictures better? Are you frustrated that your camera doesn't do what you're hoping it to do? Are you tired of blurry pictures or having everything in focus when you want some bokeh? I am going to share the "shortcuts" to take great picture without learning too much. I hope you will have the confidence and the control to shoot in whatever mode besides auto after you are reading this. Disclaimer: this is just a quick guide and intended only for quick-and-dirty instant better looking photos. You, however, will benefit much more when you are learning the basic theories behind what I'm about to say to improve your understanding and control in photography.

Before we start, what you will need is to know how to change these settings in manual mode on your camera:

1. Aperture: usually marked F/some number or just Fnumber. Example: F/5.6 or F5.6
2. Shutter Speed: usually marked 1/some number or just simply the number. Example 1/200s or 200
3. ISO: usually marked ISO followed by number. Example: ISO 400, ISO 1600.
4. Mode dial: the rotating button on top of your camera with bunch of little icons such as P, A, S, M, Auto, Scenery, Art, etc. Sometimes your camera doesn't have the mode dial physically but it has the menu system to replace it.

Consult your camera's manual if you don't know how to change those settings in full manual mode.

Let's start! 

I am tired of blurry pictures of my kids running

There are two ways to tackle this problem.
1. Full Manual. Set the mode dial to M. Set shutter speed to 1/250s or higher, set aperture as big as you can(the bigger the aperture, the smaller the number is; f3.5 is bigger than f5.6), and adjust ISO to balance the exposure meter or simply set ISO to auto if possible. A quick guide on ISO that I usually use: 1600 indoor and 200 or 400 outdoor. Please note that you always want ISO to be as low as you can.

2. Shutter Priority. Set the mode dial to S or Tv(in Canon's/Pentax' language). Set shutter speed to 1/250s or higher, aperture will adjust itself automatically, set ISO to auto if possible or set it to 1600 when indoor or 100 to 400 when outdoor.

I want to get some bokeh/blurry background

There are two ways to tackle this problem. But before you tackle the problem, make sure you zoom the lens as zoomed as possible, set your subject to get as close as you can to the camera and get as far away from the background as you can. Now onto the settings:
1. Full Manual. Set the mode dial to M. Set the aperture as big as you can, set the shutter speed to at least 1/60s for living subject or 1/30s for still object. Set ISO to auto if possible or set it to 1600 when indoor or 100 to 400 when outdoor.

2. Aperture Priority. Set the mode dial to A or Av. Set the aperture as big as you can, set the ISO to auto or to as your liking as I previously mentioned. The shutter speed will adjust itself automatically to match the exposure.

I want to make some dreamy soft beach waves pictures or waterfall pictures

Bring a tripod for sure because you want to use tripod for this. There are three ways you can do this.
1. Full Manual. Set the mode dial to M. Set aperture to at least f8 or smaller. Set ISO as low as possible(if possible below 200 or 100) and set shutter speed as slow as possible(the ideal is more than 1 second). When setting those properties, make sure to match the exposure meter to as close to 0 as possible. Then shoot the picture with the camera on tripod using timer.

2. Shutter Priority. Set the mode dial to S or Tv. Set the shutter speed to at least 1 second or slower. Set the ISO to auto or set it as low as possible, the aperture will adjust itself automatically. Put the camera on tripod and fire away using timer.

I want to shoot candid on the street and I don't want to change settings


I use the following setting:

1. Aperture Priority. Set the mode dial to A or Av. Set the aperture to as big as you can, set the ISO to auto and the shutter will adjust itself. You can also set the ISO to either 400 for indoor or 1600 for outdoor.

2. Shutter Priority. Set the mode dial to S or Tv. Set the shutter speed to 1/250s or faster, set the ISO to auto and the aperture will adjust itself. You can also set the ISO as mentioned above.


I want to shoot landscape

I use the following setting:
1. Aperture Priority. Set the mode dial to A or Av. Set the aperture to at least f5.6 or smaller, zoom the lens out to the widest possible or zoom it in just a little bit from the widest possible. Set ISO until at least you can get 1/30s shutter speed when the landscape doesn't contain any moving objects. Shoot away!


To be continued in part 2.


Sunday, March 1, 2015

Big Result in Small Package: Olympus M. Zuiko 45mm f/1.8

Hello everyone, I want to share a little bit of my experience on Olympus 45mm f1.8 lens that I love so much. I primarily want a light and portable lens that can cover a mild telephoto focal length with large aperture for shallow depth of field and low light performance. This lens is the answer.

I mainly use this lens for portrait that requires a bit of reach. But this lens doesn't only do portraits; it excels on other things such as tight landscape, street photography, architectural photography, close ups, and many other genres of photography. At this focal length, the depth of field produced by the lens is already quite thin for my taste and you can get some serious creamy bokeh from this lens without putting too much effort.

Let's dive in, what's good from this lens?

Technically speaking, the 45mm covers an equivalent of 90mm in full frame term, which is in the range of the sweet spot of many portrait lens such as 85mm, 90mm, and 105mm. On full frame terms, those lenses that I mentioned will definitely be big, heavy, and expensive. The opposite is true in the Micro Four Thirds world; the Olympus 45mm f1.8 is one of the lenses that embodied the "Spirit of MFT" in which the lens is small, very compact, lightweight, and not terribly expensive, but it delivers sharp image quality, punchy contrast, good autofocus performance, and adequate build quality.

This is one of the smaller lenses available for Micro Four Thirds. You can carry this lens inside your jeans pocket or jacket pocket and take it out only when you need it! It's not a pancake or anything like that, but still it is very small and surprisingly can always be carried in your camera bag without taking any space significantly. Combined with a small body like an E-PL6, you will pack a big picture in a small overall package.

Talking about image quality, it is just as sharp as you can get for a lens at this category. At f1.8 it is already sharp, stop it down to f2.0 it is a bit better, stop it down further to f2.8 and it is at its maximum performance. Take it down further to f4.0 and the sharpness improves only slightly from f2.8. I use this lens without hesitation at f2.0 most of the time and I know that I can extract a beautiful picture out of the lens.

I tested the hell out of this lens by shooting all kinds of tree leaves and branches from all sorts of distances and I can't seem to find any chromatic aberration in this lens at all aperture setting. I was not expecting it to be this good! Even the mighty 75mm f1.8 has chromatic aberration and this lens easily put that monster down to shame in the chromatic aberration department.

Autofocus is fast and instantaneous, just like the 75mm f1.8, the 17mm f1.8, 25mm f1.8, Panasonic 12-35mm f2.8, Panasonic 14-140mm, and many others. In fact, there are only 1 lens that has slow autofocus in the Micro Four Thirds department and that is the Panasonic 100-300mm.

Price wise, it's definitely less than US$400.00 which is crazy cheap for a lens that is 90mm in full frame term. You can definitely go to a more pricey option in this category by choosing the 42.5mm f1.2 by Leica Panasonic if you really need f1.2.

A couple of note that you should know...

Though this lens is already classified as a mild telephoto lens, the lens proved to be more flexible compared to a more serious telephoto prime such as the 75mm f1.8. However, please note that this lens doesn't focus as close as the 17mm or the 25mm. In fact, it won't do any good for any kind of macro photography unless you have a specific lens attachment for macro or similar device.

Also please note that this isn't the best lens for headshot although you can do it with this lens and get a good compression(heck, I sometimes even do headshot using the 25mm). I would suggest at least 60mm focal length in MFT for headshot as the compression starts to really help to flatter the image significantly.

Final thoughts

This is one of those "must have" lenses in the MFT world. I personally love this lens and I use it a lot for different purposes and this lens never fails to deliver the best result for a mild telephoto work. If you need a mild telephoto lens for your kit, then look no further.

Here are some of my sample shots


Bokeh is excellent!

Again, the bokeh doesn't show any lemon shapes or hexagons, it's just rounded circular bokeh that we all adore.

See how sharp the lens is!


Again, you can see how the lens managed to produce sharp results

This lens can do wonders in low light situation

This is not the most perfect composition but you get the idea of what the lens can do.

Taken during an indoor low light action show

Street photography? No problem!

Candid photo? No problem!

This is the ideal lens for this kind of portrait
I hope this post will help you to decide whether the 45mm f1.8 is the right lens for you or not. Thanks for reading and God bless you! :)

Sunday, February 22, 2015

Dat Sharpness Doe: Olympus 75mm f1.8

I just got a sweet deal on a used Olympus 75mm f1.8 which I've been considering as a serious headshot/portrait lens. The focal length of this lens is quite useful to compress the picture and smash the whole thing to look more interesting and flattering especially when shooting a person's face and thus will help me achieve better portrait result.

When it comes to portrait, the ideal focal length is a mild telephoto focal length between 85mm and 200mm in full frame terms; this prime lens is the equivalent of 150mm full frame which sits right in the ideal focal length range. Coupled with a nerve-wrecking f1.8 aperture, this is ideal to get either low light performance or a super shallow depth of field.

The lens itself isn't lightweight; it is at least as heavy as my old Tamron 17-50mm f2.8 non VC but it is not as large. It is as big as my 14-140mm f3.5-5.6 lens though. For Micro Four Thirds standard, this is big. But for APS-C standard, this is just as big as a standard kit lens.

A warning when using a lens of this focal length: shutter speed matters! You have to get at least 1/200s without stabilization to make your picture sharp. With my E-PL6 in body stabilizer, I can shoot sharp at 1/60s but lower than that is pretty much hit and miss.

What's so special about this lens?

The sharpness is OFF THE CHARTS!!! Shoot wide open, and the picture is already sharp. Stop down to f2.8 and it will reveal the smallest detail possible from a picture. Stop down to f4 for it's maximum possible sharpness but even at f1.8 the sharpness is already crazy enough!

Talking about the bokeh, this lens will give the most bokeh for your money. It has a crazy shallow depth of field due to it's focal length(even in Micro Four Thirds environment) and you should treat this shallow depth of field carefully to your advantage. I find that shooting short range portrait using this lens will require me to stop down to f2.8 to get a person's facial feature sharp from the front of the head at least to the ears. F1.8 is a bit too unwieldy to use when shooting portrait, unless your subject is far away from you.

You can read full detail of the lens on so many different websites who did some lab tests for this lens, but for real world usage this is definitely an ultra sharp lens that you can use at large aperture with ease.

The build quality of this lens is also top notch! It's all metal and the focusing ring is very smooth and just nicely dampened a little bit. It doesn't come with a lens hood and if you care about lens flare or protecting your lens, you should find either the Olympus one or the cheap third party one.

People seemed to love talking about the "color rendering" of this lens so much. I don't get it, I don't find that it produces different looking colors when compared to the other lens shooting more or less the same scene. I don't seem to notice anything about the color anyway but let me assure you that the contrast level is at least top notch! I can notice the contrast level because I used to have a lens that doesn't have a good contrast when I was still shooting Canon.

What do I need to know before I buy this lens?

Be mindful, 150mm is not a general use focal length, you might not going to use this lens frequently for your photography. 150mm is neither long or short; it's definitely not a wildlife lens and it's not short enough to get environmental photo without stepping back very far from the subject. Think carefully before purchasing this baby because the price isn't cheap and you only get one focal length. If you are specifically looking for a portrait or a headshot lens, definitely this is the right one for you. If you are looking to shoot general photography stuff or even street photography, I don't really think this is the right lens. You will be better served with something more flexible such as the Panasonic 35-100mm f2.8, or the Olympus 45mm f1.8, or similar lens.

Also, one thing that bothers me is the amount of chromatic aberration produced by this lens. I don't know if mine is a defective one or if it's simply just the case with every 75mm f1.8. The chromatic aberration doesn't go away even at f4. I have to stop it down to f5.6 for the fringing to completely disappear which is kinda sucks. The good news is that the chromatic aberration is easily removable using Lightroom or similar software.

In summary

Buy this lens if you are doing portrait or low light mild telephoto stuff. Don't buy this lens if you are doing wildlife, it is not long enough. Also for street photography, the 45mm will be easier to wield than this lens unless you are doing specific thing with your photo that requires a longer focal length. If you want a more flexible lens, get the 35-100mm f2.8 or similar lens.

Here are some example of pictures that you can expect to get using this lens:
This was shot at f1.8. Very sharp! See that bokeh?

The compression makes everything look flat and pressed. Good for portrait stuff

See those individual hair? That's the sharpness level that you can expect from this lens.

Very useful at low light to get reasonable mild telephoto street photo.

Get closer to your subject than the 45mm f1.8.

Headshot using this lens gives a very flattering result!
I hope this post helps you to decide whether this lens is the right one for you or not. Thank you and God bless you :)