Showing posts with label olympus e-pl6. Show all posts

Saturday, August 15, 2015

The Primest of the Primes: Panasonic Lumix 20mm f/1.7 Mark II

Important Update: I tested this lens with the Panasonic GX7 and I must say that the autofocus improved significantly. It no longer hunts for focus, and it also snaps very quickly, just like the rest of my MFT lenses. So it's safe to conclude that the use of this lens with older body such as the E-PL6 or anything before that may cause slow autofocus speed.
 

Hello all! Sorry for the lack of posts but with so much travelling and a lot of work recently it's kinda difficult for me to make time to write here. I do appreciate all of you who regularly visit this blog.

My E-PL6 with the 20mm, surrounded by the other lenses that I usually attach to it.
Today I want to talk about the stuff of the legend: Panasonic Lumix 20mm f1.7 Mark II. It's the second generation of the lens that has achieved cult status in Micro Four Thirds world. Delivering a field of view equivalent to 40mm in full frame, it is one of the most versatile lens for street photography as well as general walk-around all purpose prime lens.

Mounted on the E-PL6.
I bought it as a substitute for three of my lenses: Olympus 17mm f2.8, Olympus 17mm f1.8, and Olympus 25mm f1.8. All three of these lenses are fantastic, but sometimes I just wish they are blended together as a single lens rather than three separate lenses. I prefer a lens with the compactness of 17mm f2.8, but with the field of view that could mimic both 17mm and 25mm, with a fast aperture of at least f1.8. Voila, this lens showed up on an online camera shop, and I took the plunge and bought it immediately.

The Good Stuff?

It's very compact and easy to carry around!
It's extremely sharp! Holy, parking, cow! I don't pixel peep too often on my images, but even looking at normal viewing zoom, this lens is noticeably sharper than most of the lenses in my collection. I didn't expect a lens of this size and price to outperform many of my lenses, but it did and it just blew my mind away!

Shoot it at f1.7 and it's very sharp, stop it down a bit to f1.8 and the sharpness will improve. To get even sharper result on the lens, stop it down to at least f2. F2.8 will give you the optimum center sharpness quality, and f4 or f5.6 will give you excellent sharpness all across the frame. Diffraction starts to kick in at f8 and above, so avoid those aperture except if you really must have sufficient depth of field. I rarely stop down this lens and f1.7 never really gives me any sharpness issue.

Speaking of image quality, this lens also has a very good contrast. It is able to deliver images with deeper tone and you can really notice it without even pixel peeping. It's also quite resistant to flare and works really well in most lighting scenarios to generate good images, provided that you are shooting with adequate proper techniques.

It's also small, compact, and as small as the 17mm f2.8. Combined with smaller Micro Four Thirds bodies like my E-PL6, it now fits perfectly into my short pants' large pocket. It will definitely fit into regular jacket pocket and most certainly small bags. This kind of tiny lens with high level of performance on a very small form factor like this is almost unheard of in other camera formats and mounts!


The Bad Stuff...

Obviously, as you may have heard in many other review, the autofocus of this lens is kind of slow in low light, especially when combined with previous generation of Micro Four Thirds bodies like my E-PL6. It's fast in good light though, and the trick with this lens is to really look for contrasty part of the frame and focus on that to get a lock-on in low light conditions.

There is some little audible noise when you are focusing the lens, but it's not as bad as the Olympus 17mm f2.8. So it's not as over-hyped as people had said. Maybe the first generation of this lens is louder, but I'm not sure because I've never tried the older version of this lens. There is also some rattle-snake sound coming out in the audio when you are doing video using this lens, and many had said that it's cross brand compatibility issue that happens when you use Oly body like my E-PL6 with Pana lens. However, it also happened with my Olympus 17mm f1.8, so I think it's the problem that should be associated with the body itself, not with the lens.

Some people also said that they see some banding appearing on their images when they shoot this lens on an Olympus body at high ISO(above 800). I shot mine a lot on E-PL6 at ISO 1600 and 3200, and I didn't find any problem with banding whatsoever, I just couldn't find it in my images. That could be the problem of the older version of this lens that got fixed with this version of the lens. Or maybe my eyes aren't simply not sensitive enough to notice it.

To Sum It Up

The sweet story of this lens doesn't come up perfectly fine all the time. The autofocus mainly got me a bit bummed a few times as I have to wait for the lens to hunt the focus back and forth a few times or even sometimes I have to re-focus the lens multiple times to get the correct lock-on focus. But besides that, this is the lens is focusing as fast as the others in good light.

Many people complained about 20mm being not wide enough as they are used to 17mm(35mm equivalent) field of view. It's true, there is a noticeable difference of field of view between 17mm and 20mm and it's a significant difference that could make or break a shot. I personally always found the 17mm to be too wide most of the time so the 20mm really solves that problem, but you may feel different about it. So make sure you try to get the feel of 20mm before you make your decision.

So, is this lens able to substitute those three lenses as I mentioned before? Partially, yes. My 17mm f2.8 is now packed in its original box and ready to be sold soon. My 17mm f1.8 and 25mm f1.8 hasn't been used for a month since I use this lens. But I'm not ready to sell those primes yet as both the 17mm and 25mm f1.8 are very fast when it comes to focus speed, and my 20mm will never be able to rival those lens. The speed difference will matter the most when it comes to street photography under less than ideal light and in that kind of environment, I will want to rely on either my 17mm or 25mm instead of 20mm; but for anything else that doesn't require fast focusing, the 20mm will always be my choice.

See some of my sample images taken with this lens:

This is the field of view of 20mm. It could mimic either 17mm or 25mm.

See those details in the meat, my goodness it's just so sharp!

It's not wide enough, but so is the regular 17mm.

An attempt to get a street photo using this lens. Luckily the light is good so it doesn't hunt focus.

It's very good for general purpose walk-around lens.

Works well enough in contrasty scene.

This is the 20mm working to mimic the 17mm's wideness.

This is the kind of image that I am after with this lens.
I use it in studio environment too, and I love how flexible it is!
Environmental portrait with this lens is fantastic!

I don't know why, but I tend to use this lens for food photo

Let me know if you see some banding in this image. This was shot at very high ISO.


This was also shot at a very high ISO, I didn't notice any banding here.

I hope this post will help you to determine whether the 20mm f1.7 Mark II is the right lens for you or not. Also consider the older version of this lens if you decide that 20mm is the right lens for you as it is cheaper than the Mark II version. Until next post, cheers and God bless you :)

Important Update: I successfully managed to get the banding issue to appear on my shots! Horay! It's actually happening only and only when you take a picture in within just a few seconds, just after you coupled this lens with the camera and turning it on right away right after the coupling. The first few seconds of the shots after I coupled this lens with the camera finally showed some bands. But when you keep this lens on the body for so long without changing lens, the banding issue disappears again, even if you quickly turn on the camera and shoot right away.

Tuesday, March 31, 2015

My Thoughts on Olympus PEN E-PL6 (Updated with Sample Pictures)

Hello people, today I want to share my thoughts of my lovely little Olympus E-PL6. I bought the E-PL6 a few months ago as a secondary body for my GX7 and the main function of the camera is to have a secondary lens attached at all times to cover the blind spots of the other lens that's being attached to the GX7.

For example, if I have a 12-35mm on the GX7, I would want to have either a 7-14mm on my E-PL or a 75mm f1.8 depending on what I need. If I have the 17mm on the GX7, I want the E-PL6 to wield the 45mm f1.8. If I have a 14-140mm on the GX7, I would want to have either a 7-14mm or the 100-300mm on the E-PL6. You get the idea.

This is my E-PL6 with all of the lens that I usually attach to it.

Let's start with the basic spec

It is small, basically it is only 10cm wide, 6cm high, and 3cm thick. There's not a whole lot of buttons, it doesn't even come with a dedicated ISO and white balance buttons. There is a rotating dial that you can use to change aperture or shutter speed depending on the mode which then can also be used to adjust exposure compensation. The camera has a detachable extension grip that improves the handling a little bit which I always install on the camera. The shutter button feels a bit loose and you have to really concentrate to feel the half shutter position. However, to make things better, you can enable the Super Control Panel from the menu and you can quick access the settings that you need to change without going to the menu.
The E-PL6 with the 75mm f1.8 to cover mid telephoto portrait.

The screen is a bit old-res and outdated for a 2014 camera. It can be tilted 180 degree upward and 45 degree downward, but it can't be flipped. But it is enough for me to chimp on a picture to check for focus and motion blur.

Image quality wise, it has the same sensor as the one in OM-D E-M5, so basically you have the same top notch MFT image quality from the flagship camera. It is sharp and it offers plenty of dynamic range, but it isn't as clean as my GX7 on high ISOs. It has the in body stabilizer like every other Olympus MFTs but it's a bit crippled; I think it only improves your shutter speed for a stop or two stops, so it's not really like the one in the flagship OM-Ds.
The E-PL6 with the Panny 14-42mm II as a general purpose lens

Initially, not that impressive except for the image quality

The E-PL6 itself wasn't intended to be my main camera and I don't need it to have a spectacular level of performance. I didn't have the intention to bring it out on its own when I want to photograph something. For that, I thought I would always bring the GX7 as I trusted it to be the camera that can handle itself nicely.....until few months of using both the cameras together.

Surprisingly, the E-PL6 stood up its ground and it changed my mind

Yes, it doesn't offer the best control for manual settings, it doesn't offer the fastest autofocus(it hunts the focus badly at low light), it doesn't give the cleanest high ISO performance. Heck, even the handling is a bit too fiddly for my hands because it lacks the grip of bigger camera. But after a few times carrying it on a few casual trips and using it by itself without the GX7, it somehow managed to impress me!
The E-PL6 with 17mm f2.8 for ultimate compactness.

First, the small size makes it easier for me to carry it all day as it is smaller than my GX7. For non serious stuffs, I usually attach the 17mm f2.8 pancake to the E-PL6 and slip it to my cargo pocket on my short pants. At this point, I enabled the "Super Control Panel", set the Fn button to ISO button, put the camera on aperture priority, and shoot away. I can now bring this camera anywhere with me and extract good quality images when I need it to.

The camera bonds very well with normal sized or pancake sized prime lenses but it's no slouch when paired with bigger zooms too. The camera wields the 7-14mm wide angle lens very well and it is about the perfect match in terms of size and ease of handling. Even the mighty 75mm f1.8 bonds really well with E-PL6! There are times when I am crazy enough to put the 100-300mm and it can still be handled; but be very careful as now the lens gets heavy, you have to pay attention and hold the lens too with your left hand, otherwise you can hurt your right hand from the unbalanced weight distribution.

With 45mm f1.8 for general portrait.

I have survived many days without the GX7 and using the E-PL6 as my main camera, even for serious photograph needs. The layout of the camera forces you to think simple and be straight forward. It's limiting and frustrating sometimes, but it makes you approach photography with a sense of minimalism.

With 25mm f1.8 for tight walk-around lens.
There was one time when my only kit consisted of only an E-PL6 as my main camera, a 17mm f1.8 and a 45mm f1.8; it was during a travel which means I couldn't access my other gears. I left my GX7 at home, and carry no other lens. Heck, I didn't even carry an extra battery nor an extra SD card for the E-PL6! But to my surprise, it made me think and concentrate before I shoot and I pick my shots carefully. I survived and I was quite happy with the quality of the photos that the E-PL6 spits out to my computer. A healthy restriction can make you experience photography in a better way, I guess.

And that brings us to the conclusion

The E-PL6 is a good camera and it's a bit underrated by the other big guns in MFT world. It handles almost anything quite nicely and you can definitely use it as a main camera when you need it. After a few months using it, I am very confident that the E-PL6 will continue to deliver great results in any circumstance that demands specific photography needs from it. Sure, there are many flaws as I explained above and those flaws may cause you to miss a shot, but for what it can do and for the price, the E-PL6 fits my needs and it is the best bang for the buck camera ever!
With 17mm f1.8 for a wide walk-around lens

As of now, the price of E-PL6 slowly drops as the E-PL7 is already present in the market. Many people will ask if they should buy/upgrade to the E-PL7. My answers: if you already have an E-PL5 or an E-PL6 then don't buy E-PL7. If you own anything older than E-PL5 or if you are looking for a new small camera with interchangeable lens, then you should consider E-PL 5 or E-PL6 if you want cheaper price, but consider E-PL7 if you need the front wheel for better manual control.
With Panny 7-14mm to cover ultra wide shots.

For me personally, I will keep the E-PL6 for a long time until there comes the time when I need to upgrade it to a significantly more enhanced camera with much better IQ.

That's it for now, folks. I hope you enjoyed this post, cheers and God bless you :)

Here's some sample images taken using the Olympus E-PL6:
The E-PL6 wields the Panasonic 7-14mm with no problem. 

The 7-14mm does make it a bit too front heavy for the E-PL6 but not too much.

Again with the Panasonic 7-14mm.

Also with the 7-14mm

This was using Olympus 45mm f1.8

The 45mm f1.8 is the best matching lens for the E-PL6.

With the 7-14mm again.

Taken with Olympus 17mm f1.8. Also one of the best matching lens for E-PL6.

7-14mm again.

7-14mm again.

With the 75mm f1.8.

I think this was 25mm f1.8 if I'm not mistaken.

45mm and E-PL6 is the best!

Again 45mm.

Again 7-14mm

Again 45mm.


Wednesday, March 18, 2015

My Thoughts on Shooting Off Camera Flash in Micro Four Thirds Environment

Hello everyone, today I want to talk about my experience of Off-Camera-Flash in the Micro Four Thirds system. I am recently trying to improve the quality of my pictures significantly by learning how to light properly. Naturally, I learned about all the options: natural light, available light, artificial light. While I have been natural light shooter for a long time, there are times when natural light won't let you grab that picture that you want simply because you will have to crank your ISO to get the exposure from very dim natural light and the picture looks soft due to high ISO noise. That's when I decided to learn about using speedlight.

David Hobby Inspired

I am now a regular visitor of David Hobby's blog strobist.blogspot.com which held tons of high quality information about how to "light", mainly using off camera flash. Automatically, I then started to explore off camera flash and bought the right stuff to help getting better result using off camera flash and start to use that technique more and more to produce my shots. Now I flash almost everything when I bring my flash and I do it off camera handheld with no lightstand whatsoever. Doing it with Micro Four Thirds is really liberating because the camera is small and light enough that you can handle it with one hand easily while having your other hand holding the flash off camera, with or without modifier.

However, it was a bit difficult to me at first to get the right tools for doing off camera flash that are compatible with Micro Four Thirds since the information was scattered all around the internet and there was no proper single documentation of many different methods of doing off camera flash photography with Micro Four Thirds, especially the one that can cover newbies-level FAQs.

I spent at least three months to understand what will work and what will not work, and basically found interesting discoveries along the way that might be useful to know when you start shooting OCF using Micro Four Thirds. And now let me share some of my experience! Please be mindful that this is basically my personal experience and don't treat this blog post as some sort of an exact rule that you must follow; I could be wrong with some of the information especially about wireless triggers so please double check before you proceed with a wireless trigger.

Start basic off camera flash using integrated wireless flash system on newer Micro Four Thirds cameras and flash

Olympus FL-600R
When you purchased recent releases of Micro Four Thirds cameras(late 2013, 2014, early 2015), your camera will have the wireless flash capability using RC mode(remote control). The RC mode on your camera will work with flashes that support RC mode in Micro Four Thirds environment.

The way to do this is by using the built in pop up flash or the included mini hot shoe flash that comes with your camera, go into the menu and enable wireless flash or RC mode. Your built in flash now will act like a commander and it will send light signal to compatible flash that carries flash power information as well as the trigger, so that your external flash will fire with the desired flash output. If you want the flash to fire with automatic exposure, set the RC flash to TTL mode. If you want to set the flash power manually from your camera. set the RC flash to manual mode and set the desired power. Now align the external flash' optical sensor so that it can "see" the built in flash of your camera. You are now ready to fire your shot and get the flash to contribute to your exposure. You can put the flash down somewhere, handheld(as how I do it most of the time), or use a lightstand as long as the optical sensor can see the built in flash.

Flashes that are compatible with this RC mode is usually Panasonic or Olympus branded flash with "R" letter on the name. My preferred flash for this kind of setup is the Olympus FL-600R. To enable RC mode on the flash, simply change the mode to RC mode. Set the channel and the group on the flash to match those in the camera menu.

A quick information about the Olympus FL-600R; if you, like me, are doing full manual flash and need to change the power setting a lot, the FL-600R will provide the manual power setting with GN measurements by default which is hard to understand and not really intuitive for most shooting situation. You can change it to the regular flash power output unit by holding down the OK button for a few seconds, turn the dial until you see GN on, then change it to off using the dial.

If you don't want to spend money on Olympus or Panasonic branded full featured flash, you can go to third party brand that offers fully featured MFT compatible flash such as Nissin (i40, Di466). or Metz system; both feature TTL, high speed sync and many other standard features at slightly lower price.

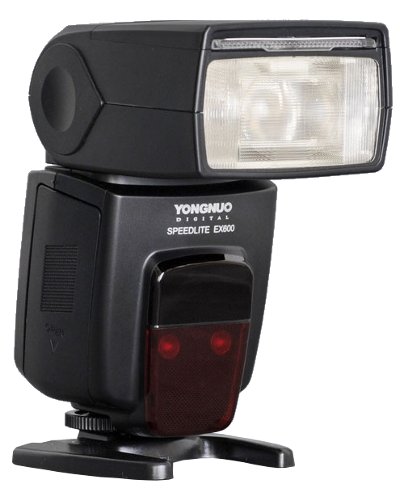
On the budget: use third brand flash with optical slave capability

Yongnuo YN560EX, or also known as EX800
If you, however, can't afford such flash, you can go even lower with full manual flash that doesn't offer TTL. This way you can still use your flash off camera but lose the automatic TTL capability and the high speed sync capability. The general choice for such flash will be Yongnuo YN560 series, or other popular manual flash. My own personal choice is the Yongnuo YN560EX.

There are two ways you can do wireless off camera flash with these kinds of flash. The first way will always work and that is to just use the built in flash of your camera, set it to its lowest power(to minimize the effect of the exposure) and set your external flash to Slave mode(usually S1 or Sl Manual) and align the flash' sensor so that it can "see" the built in flash of your camera. When the pop up flash fires, the external flash will fire immediately and affect the picture. You will just have to set the power manually to get the desired exposure. Normally you will want the built in flash to contribute as little as possible to the exposure by compensating it as low as possible but you can also experiment by adding it to your picture as a fill flash.

The second way will work only with some flashes that have delayed Slave mode such as my Yongnuo YN560EX. The advantage of this way is that the pop up flash won't affect the exposure at all and will only act as a commander. To do this, go to the camera menu and turn on wireless flash or RC mode. Then go to your external flash and set its mode to Slave 2(S2 as in the case with my YN560EX). Set the power of the external flash manually, align the external flash sensor to the built in flash and fire away! Your pop up flash won't contribute to the exposure.

Use Off Camera Flash Cord, and use any flash!

Phottix Universal Duo TTL Flash Cord.
If you don't like the idea of aligning your external flash with the pop up flash of your camera, you will have two choice to avoid that and still be able to do off camera flash: 1) Wireless Remote Trigger or 2) Flash Cord. My choice for short range off camera flash photography is to use the Flash Cord.

My choice for flash cord is Phottix Universal Duo TTL Flash Cord, as pictured on the left. This cord features a pass through hotshoe connector that enables you to mount another hotshoe accessories on top of it, maybe your remote, or maybe another flash. As weird as it may sound, this pass through TTL cord isn't actually TTL at all, even though I bought the Canon version which is supposedly compatible with Olympus/Panasonic system. It turns anything to become manual; but I have no problem with it because I shoot my flash manually most of the time.

To use it, simply put your flash on the other end of the cable's hot shoe, and mount the foot of the cord that has pins on it to your camera's hotshoe. Set your flash to manual, adjust the power, and you are ready to take picture.

Some known information: you can have TTL capability using flash cord if you are buying Canon's version of off camera flash cord or a third party cord without pass through TTL that has the same hotshoe configuration with Canon's cord. Usually the name contains the word OC-E3. Use this cord together with your TTL capable flash, and you will have all the automatic features as well as the high speed sync capability maintained when using the cord. The only known issue is the reduced normal sync speed limit due to the construction of the cord.

The benefit of using this camera setup is that it is optimized for handheld external flash, which is very good for run and gun off camera flash photography such as in wedding or when you are documenting an event. If you need to put it on a lightstand, then you will need a long cord for that because most of the cords are only 1 meter long.

For far away off camera flash needs, go with a wireless remote flash trigger

Phottix Strato II transmitter and receiver.
Sometimes you just need to have your external flash very far away from you, the longest cord that you can buy is just too short for that, and your wireless RC mode alignment is blocked by an object. The only way to tackle this problem is to use wireless remote trigger.

This is where it gets tricky; not many people know which triggers work with Micro Four Thirds camera. The documentation gets scattered all around the internet and it will take you a long time to learn about them all.

I will tell you all that I know in this paragraph about remote flash trigger. Most of the triggers that will work will be manual only triggers. Some well known triggers for that includes PocketWizard manual trigger that isn't brand specific, Yongnuo manual triggers, Phottix manual triggers, and Cactus V series in manual mode. There is no TTL capable wireless flash triggers that is Micro Four Thirds compatible as of today that I know. Also high speed sync wireless flash triggers is not available yet for Micro Four Thirds, even for manual triggers.

For PocketWizard, that means Plus series, including II+ , Plus III and PlusX; as always with PocketWizard, your flash needs to have PC Sync cable jack, which isn't present in my Olympus FL600R. For Yongnuo, that means the RF series(RF603, RF605, etc). For Phottix, this means Phottix Atlas, Ares, and Strato series(make sure they are non TTL ones, buy the Canon version to match the hotshoe pins). For Cactus, the V series should work in manual mode but I have no experience.

My GX7 with Phottix Strato II attached.
My personal experience is with the Phottix Strato series. I bought a Phottix Strato TTL, and it DOESN'T WORK because of the TTL thing; it just won't fire at all, unless when I mount it to a Canon camera.

I then bought a Phottix Strato II Multi which works in a fantastic way and syncs down to 1/320ms on my GX7 and E-PL6 with no problem. Keep in mind that this trigger is full manual and doesn't do high speed sync. If you need high speed sync, you must use the wireless RC mode.

Or, like me, you can trick the camera to get the high shutter speed exposure down to sync speed range shutter speed by using a 4 stop ND filter. My preferred ND filter is Hoya but any brand shouldn't matter as long as you check for any color cast and sharpness issues before you buy it. Please note that by doing so, you will not only drop the exposure of the ambient, but also you are going to lower the flash power by 4 stop. To compensate for that, you have to increase the flash power by 4 stops(for example: 1/32 to 1/2).

On a more positive note, the transmitter has a pass-through TTL hotshoe that actually works to let-through the TTL information to whatever thing that's on top of it, so you can actually mount another flash on top of the transmitter and have all the TTL and high speed sync capabilites maintained...or mount another trigger....or mount your flash cord for a more complicated multi flash setup... or mount any other hotshoe accessory that requires all the pins!

What about my personal setup?


Crazy off camera multi flash setup with one trigger.
See this crazy picture on the right? I can trigger two flashes that are connected by the off camera flash cord using the Phottix Strato II. I can also put the cord on top of the transmitter on my camera and have two flashes there, one off camera on the cord handheld using my left hand as the main light, one on top of the transmitter as the fill or to bounce, and an extra flash on the receiver being triggered far away from the camera.

Modifiers?

As for modifiers, I do use Rogue Flashbender Large a lot for event photography and product photography with my off camera flashes. This modifier works best at close range and can almost act like a soft box when you put a white diffusing material in front of it.

I also sometimes use my home-made Lightsphere DIY made from plastic paper bowls with holes to mount the flash. Not the prettiest but it works and I can't justify spending US$80.00 for a modifier yet.

For outdoor, I do everything bare flash and try my best to control the harsh shadow to appear as minimal as I can.

In the future, I will probably get an umbrella for studio-like photo or for on location shooting. Or maybe a real soft box. But for now, I am happy with what I already have and they do their job very well, at least for the kind of photos that I need to make(product photography, event documentary, quick indoor portrait).

That's all for my off camera flash experience, I hope this post helps you and I will definitely update either here or on a new post if I learn something new. Cheers and God bless :)